Posts : 127 Join date : 2008-11-16 Age : 35 Location : Tucson, AZ
Subject: Gas-Charged Spring Trunk Lift Sun Feb 15, 2009 11:54 pm
It's a fairly simple job to do, now that I got all the details figured out ha-ha. I ordered all the parts from the amazing website I came across, McMaster-Carr. You will need the following items: (the numbers at the end are part numbers) 2 - Ball Mounting Hardware, Zinc-plated-steel, Flat Ball Bracket - 9512K91 2 - Ball Mounting Hardware, Zinc-pltd-stl,90 Deg Angle Long Neck Ball Bracket - 9512K92 4 - 10 Mm Steel Ball Socket For M6 Thread, Gas Spring With Threaded Ends - 9416K74 2 - Gas Spring With Threaded Ends, 100 Force, 15.63" Extended Length, 6.30" Stroke - 9416K356 12 - Screws/bolts w/ nuts (I'm not sure what size I used, just grabbed some that I had laying around)
If you want, you can also get the seal protectors, 4185T11, but its obviously not necessary. I opted for them though, just to be on the safe side. Another note, you could possibly get away with less powerful springs, but I am not sure I would waste my time trying it. It's the same price, no matter what. I started with the 20 lb each, then the 60 lb each, and neither worked. So I upped the ante and went with 100 lb each, and that finally worked!
The very fist thing you have to do is remove the old torsion bars. This can be kind of dangerous/fun (depending how you look at it). I simply took a cinder block, set it in trunk, and used it as a pivot for a crowbar to just lift up the free end of the bar and out of the notch.
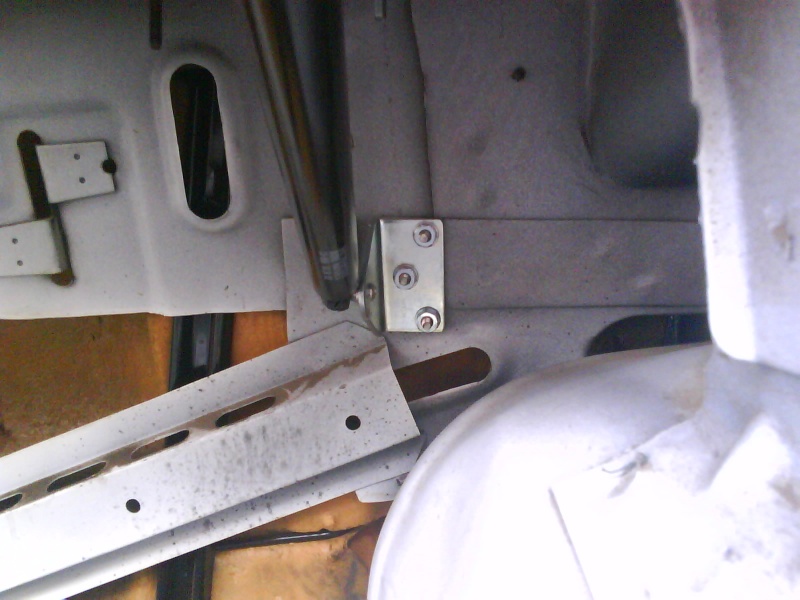
The next step is to mark and drill the holes, obviously. The locations can best be seen in the following pictures:
I cannot stress enough, the importance of getting the holes in the hinges straight. Any correcting you have to do to your holes will continue to lower the integrity of the hinges. which we obviously don't want. Mark twice, drill once. And obviously, mirror the same on the other side of the trunk.
Next you attach the brackets. 'Nuff said.
Then put together the springs and the ball sockets. If you are using the seal protectors, don't forget to put them on first, obviously. Don't worry if the sockets don't open up the same way, you can twist the entire rod/cylinder to get them facing the right direction.
After that, you attach the cylinder end of the springs, to the brackets that are on the back of your seat. You could do it the other way around, but I think it looks better this way.
Finally, the only difficult part of the entire operation. You have to compress the spring far enough to attach it to the ball on the trunk hinge. This will require the most effort of the whole deal. What I ended up doing was building up some boards and laying a hydraulic hand jack on them sideways, with the top pushing on the end of the spring. Then I pumped it into position and popped it into place. you have to be very careful, and I highly recommend having someone assist in this step.
Voila! You now have a hands free trunk lift and freed up even more space in the trunk!
]
If you pass this along to your friends, place make sure i get credit for the original set up please.
bigblockcowboy
Posts : 154 Join date : 2008-11-11 Age : 49 Location : Hinton, Alberta, Canada
Subject: Re: Gas-Charged Spring Trunk Lift Mon Feb 16, 2009 1:11 am
Thanks for the tech eignub! I am definitely doing this on the super Zeph. It almost looks factory!
detroitiron2000
Posts : 320 Join date : 2008-11-08 Age : 61 Location : Bridgman, Michigan
Subject: Re: Gas-Charged Spring Trunk Lift Mon Feb 16, 2009 12:23 pm
Man I love this...simple and effective. Perfect design and yes, it does look factory. Thanks for going through the effort.